Unveiling the Magic of Red Velvet Sugar Cookies
Red velvet cake holds a special place in the hearts of dessert enthusiasts, celebrated for its unique flavor, velvety texture, and distinctive crimson hue. But what if you could capture that magic in a delightful, bite-sized form? Enter
red velvet sugar cookies: a brilliant culinary crossover that combines the beloved characteristics of red velvet cake with the satisfying chew of a classic sugar cookie. These treats are not just visually striking; they offer a subtle chocolate undertone, a tender crumb, and endless possibilities for decoration, making them perfect for any occasion, from festive holidays to everyday indulgence.
The allure of a red velvet sugar cookie lies in its ability to transform a traditional dessert into something extraordinary. They offer the comfort of a homemade sugar cookie while elevating the experience with a touch of elegance and mystery. Achieving that perfect balance of softness and vibrant color might seem like a secret art, but with the right techniques and ingredients, anyone can master these show-stopping cookies.
The Distinctive Red Velvet Flavor Profile
At its core, red velvet flavor is more than just red food coloring. It's a delicate interplay of cocoa, vanilla, and often a hint of tang, traditionally from buttermilk or vinegar, which reacts with baking soda to create a tender texture and subtly enhance the red hue. In a cookie, this translates to a cookie that isn't intensely chocolatey, but rather boasts a mild, complex cocoa note that complements the vanilla beautifully. The vibrant red color, while primarily achieved with food coloring, is an essential part of its identity, creating an instant visual appeal that promises a special treat.
Why Opt for a Cut-Out Cookie?
Transforming red velvet into a cut-out sugar cookie format adds immense versatility. Unlike a cake, these cookies can be shaped into hearts for Valentine's Day, stars and trees for Christmas, or any fun shape your cookie cutters allow. This makes them ideal for gifting, cookie exchanges, or simply adding a personalized touch to your dessert spread. Their sturdy nature once baked also makes them perfect for decorating with icing, drizzles, and sprinkles, allowing for creative expression that’s less feasible with a delicate cake.
Key Ingredients for Red Velvet Perfection
The foundation of any great cookie lies in its ingredients. For
red velvet sugar cookies, each component plays a crucial role in achieving that sought-after softness, color, and flavor. Precision in measurement and quality of ingredients are paramount.
Flour Power: Achieving the Right Texture
All-purpose flour provides the essential structure for your cookies, allowing them to hold their shape during baking and cutting. However, how you measure it is critical. To avoid dense, dry cookies, always spoon your flour into the measuring cup and level it off with a straight edge, rather than scooping directly from the bag. Scooping can compact the flour, leading to an excess amount that results in a tough, crumbly cookie instead of the desired soft texture.
Cocoa & Color: The Heart of Red Velvet
For that authentic red velvet essence,
unsweetened cocoa powder is indispensable. It provides the subtle chocolate flavor that defines the treat. Importantly, use *natural* unsweetened cocoa powder, not Dutch-processed. Natural cocoa is acidic, which is important for activating the baking soda in the recipe, contributing to both the cookie's lift and, in traditional red velvet, a more pronounced red color (though food coloring does the heavy lifting here). Dutch-processed cocoa is alkalized, neutralizing its acidity and dulling the vibrant red we're aiming for.
As for the "red" in red velvet,
red food coloring is the star. While liquid food coloring works, for a truly deep, rich crimson, consider using gel food coloring. Gel colors are more concentrated, meaning you'll need less to achieve a more intense hue without introducing excess liquid into your dough. Experiment with the amount to find your perfect shade – some prefer a subtle blush, while others aim for a dramatic, vibrant red.
Fats and Leavening: Softness and Structure
Unsalted butter, at room temperature, is key for tender cookies. It creams beautifully with sugar, creating air pockets that contribute to a light, airy texture.
Granulated sugar not only sweetens but also helps tenderize the dough and creates a crisp edge.
The choice of egg can also impact texture. Many recipes, including the classic rendition for these cookies, call for a
large egg yolk. The yolk adds richness and tenderness without introducing too much moisture from the egg white, which can sometimes lead to cookies spreading excessively. This focus on the yolk helps achieve that characteristic soft, melt-in-your-mouth texture.
Baking soda is the primary leavening agent. In traditional red velvet, it reacts with acidic ingredients like buttermilk. In the absence of buttermilk in many cookie recipes, the natural acidity of the cocoa powder provides enough of a reaction to give the cookies a slight lift and contributes to their tender crumb.
Fine salt balances the sweetness and enhances all the flavors, preventing the cookies from tasting bland. Finally,
pure vanilla extract adds a layer of warmth and complexity that rounds out the red velvet flavor beautifully.
Actionable Tip: Room Temperature Ingredients
Always ensure your butter and egg yolk are at room temperature. This allows them to cream together more effectively, creating a smoother dough and a more consistent final product. Cold ingredients don't emulsify as well, leading to a lumpy dough and potentially tougher cookies.
Mastering the Dough: From Mixing to Chilling
The journey to perfect
red velvet sugar cookies begins long before they hit the oven. Proper dough preparation is crucial for achieving both superior texture and maintainable shapes.
The Art of Mixing: Preventing Tough Cookies
The mixing process is straightforward but requires attention to detail. Start by sifting your dry ingredients – flour, cocoa powder, baking soda, and salt – together. Sifting ensures they are well combined and aerated, preventing lumps in your dough.
In a separate, larger bowl, beat the room temperature unsalted butter and sugar with an electric mixer until just combined. You're not looking for a super light and fluffy mixture like you would for a cake, but rather a smooth, uniform blend. Beat in the egg yolk until just incorporated, followed by the red food coloring and vanilla extract. Scrape down the sides of the bowl frequently to ensure even distribution of color and flavor.
Reduce your mixer speed to low and gradually beat in the dry flour mixture. Mix only until the dough *just* comes together. Overmixing develops the gluten in the flour, which can lead to tough, chewy cookies – the opposite of the desired soft texture. Once the dough forms, divide it into two disks and wrap them tightly in plastic wrap.
Chilling: A Non-Negotiable Step for Perfect Shape
This step is critical for preventing your cookies from spreading too much in the oven. Refrigerate the dough disks for at least 2 hours, or until firm. Chilling allows the butter to solidify, which helps the cookies hold their shape during baking. It also gives the flour a chance to fully hydrate, resulting in a more tender cookie. Don't rush this step – patience here truly pays off with beautifully defined cookies.
Practical Advice: Don't Overmix!
Once you add the flour, mix on low speed only until the dry ingredients are fully incorporated and the dough comes together. A few streaks of flour are better than an overmixed, tough dough. Finish mixing by hand if necessary.
Baking and Decorating Your Vibrant Treats
With your perfectly chilled dough ready, the final steps involve shaping, baking, and bringing your cookies to life with delightful decorations.
Rolling & Cutting: Precision for Uniformity
Position oven racks in the top and bottom thirds of your oven and preheat to 350 degrees F (175 degrees C). Line two baking sheets with parchment paper.
When ready to roll, take one disk of dough from the refrigerator. To prevent sticking and ensure even thickness, sandwich the dough between two sheets of parchment paper lightly dusted with flour. Roll the dough to an even 1/8 inch thickness. This consistent thickness is vital for uniform baking. Use a 2 1/2-inch cookie or biscuit cutter (or any shape you prefer) to cut out your cookies and place them on the prepared baking sheets about 1 inch apart. Reroll any scraps, chilling briefly if the dough becomes too soft, and continue cutting until all dough is used.
Baking to Perfection: The 8-10 Minute Sweet Spot
Bake the cookies for 8 to 10 minutes, rotating the baking sheets halfway through. You’ll know they’re done when they are set and appear a beautiful brick red. Avoid overbaking, as this is a common culprit for dry, hard cookies. The cookies might still seem slightly soft in the center when you take them out, but they will firm up as they cool.
Let the cookies cool on the baking sheets for about 3 minutes after removing them from the oven. This allows them to set further before you transfer them to a wire rack to cool completely. Once fully cooled, store them in an airtight container at room temperature for up to 3 days, maintaining their delightful softness. For more detailed tips on baking the perfect batch, you might find our guide,
Bake The Best Soft Red Velvet Sugar Cookies: Your 2026 Guide, incredibly helpful.
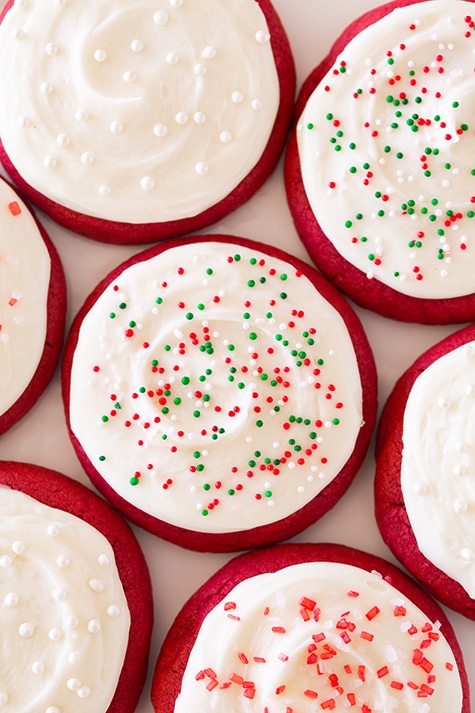
Creative Decorating Ideas
One of the most enjoyable aspects of making
red velvet sugar cookies is decorating them! Their vibrant color provides a fantastic canvas for various embellishments. A simple yet elegant option is a white chocolate or cream cheese glaze drizzle. For a more dramatic effect, consider an easy chocolate drizzle.
If you're feeling adventurous, an eggless royal icing provides a smooth, hard finish that's perfect for intricate designs. This eliminates the need for raw egg whites or meringue powder. Don't forget the sprinkles! A dusting of white or silver sprinkles can add sparkle, while themed sprinkles can enhance holiday designs (think red and green for Christmas, or pink and white for Valentine's Day hearts). For an array of festive cut-out and decorating ideas, check out our dedicated article:
Homemade Red Velvet Sugar Cookies: Festive Cut-Out & Decorating Tips.
Troubleshooting Common Red Velvet Cookie Issues
Even with the best recipes, sometimes things don't go exactly as planned. Here are some common issues you might encounter with
red velvet sugar cookies and how to fix them.
Why Are My Cookies Dry?
This is often due to either over-measuring flour or overbaking. Always spoon and level your flour to ensure accuracy. When baking, keep a close eye on the clock and the cookie's appearance. The moment the edges are set and the center looks firm but not hard, pull them out. They will continue to bake slightly on the hot sheet.
My Cookies Spread Too Much!
Several factors can cause cookies to lose their shape. The most common culprit is insufficient chilling time for the dough. Ensure your dough is firm before rolling. Using too much butter, or butter that is too soft, can also contribute to spreading. Lastly, if your oven temperature is too low, the butter will melt before the cookies have a chance to set. A quick fix can sometimes be to chill your cut-out cookies on the baking sheet for 10-15 minutes before baking.
Dull Color?
If your cookies aren't as vibrant as you hoped, it's likely an issue with your food coloring. Liquid food coloring can be less potent than gel. If you used liquid, try adding a bit more next time, or switch to a high-quality gel food coloring for a more intense hue. Also, ensure you're using natural cocoa powder, as Dutch-processed cocoa can mute the red tones.
Conclusion
Baking
red velvet sugar cookies is a rewarding experience that merges the elegance of a classic cake with the charm of a cut-out cookie. By paying attention to key ingredients like natural cocoa and quality food coloring, understanding the importance of proper mixing and chilling, and mastering the baking time, you can consistently achieve cookies with perfect softness and a stunning, vibrant red color. Whether you're making them for a special occasion or simply to satisfy a craving, these cookies are sure to impress with their unique flavor and undeniable visual appeal. So, roll up your sleeves, embrace the joy of baking, and prepare to delight in your homemade red velvet masterpieces!